Health
Images of Healing Tooth Extraction: A Visual Guide to Recovery
Undergoing a tooth extraction can be intimidating, especially when you’re unsure of what recovery looks like. Whether you’ve had a wisdom tooth removed or a decayed molar extracted, knowing what’s normal during the healing journey is essential. Fortunately, images of healing tooth extraction can offer clarity, reassurance, and guidance.
Understanding the Tooth Extraction Healing Timeline
The healing process post-extraction occurs in well-defined stages. Each phase reveals visual cues that indicate progress. While timelines may vary slightly, the overall pattern remains consistent.
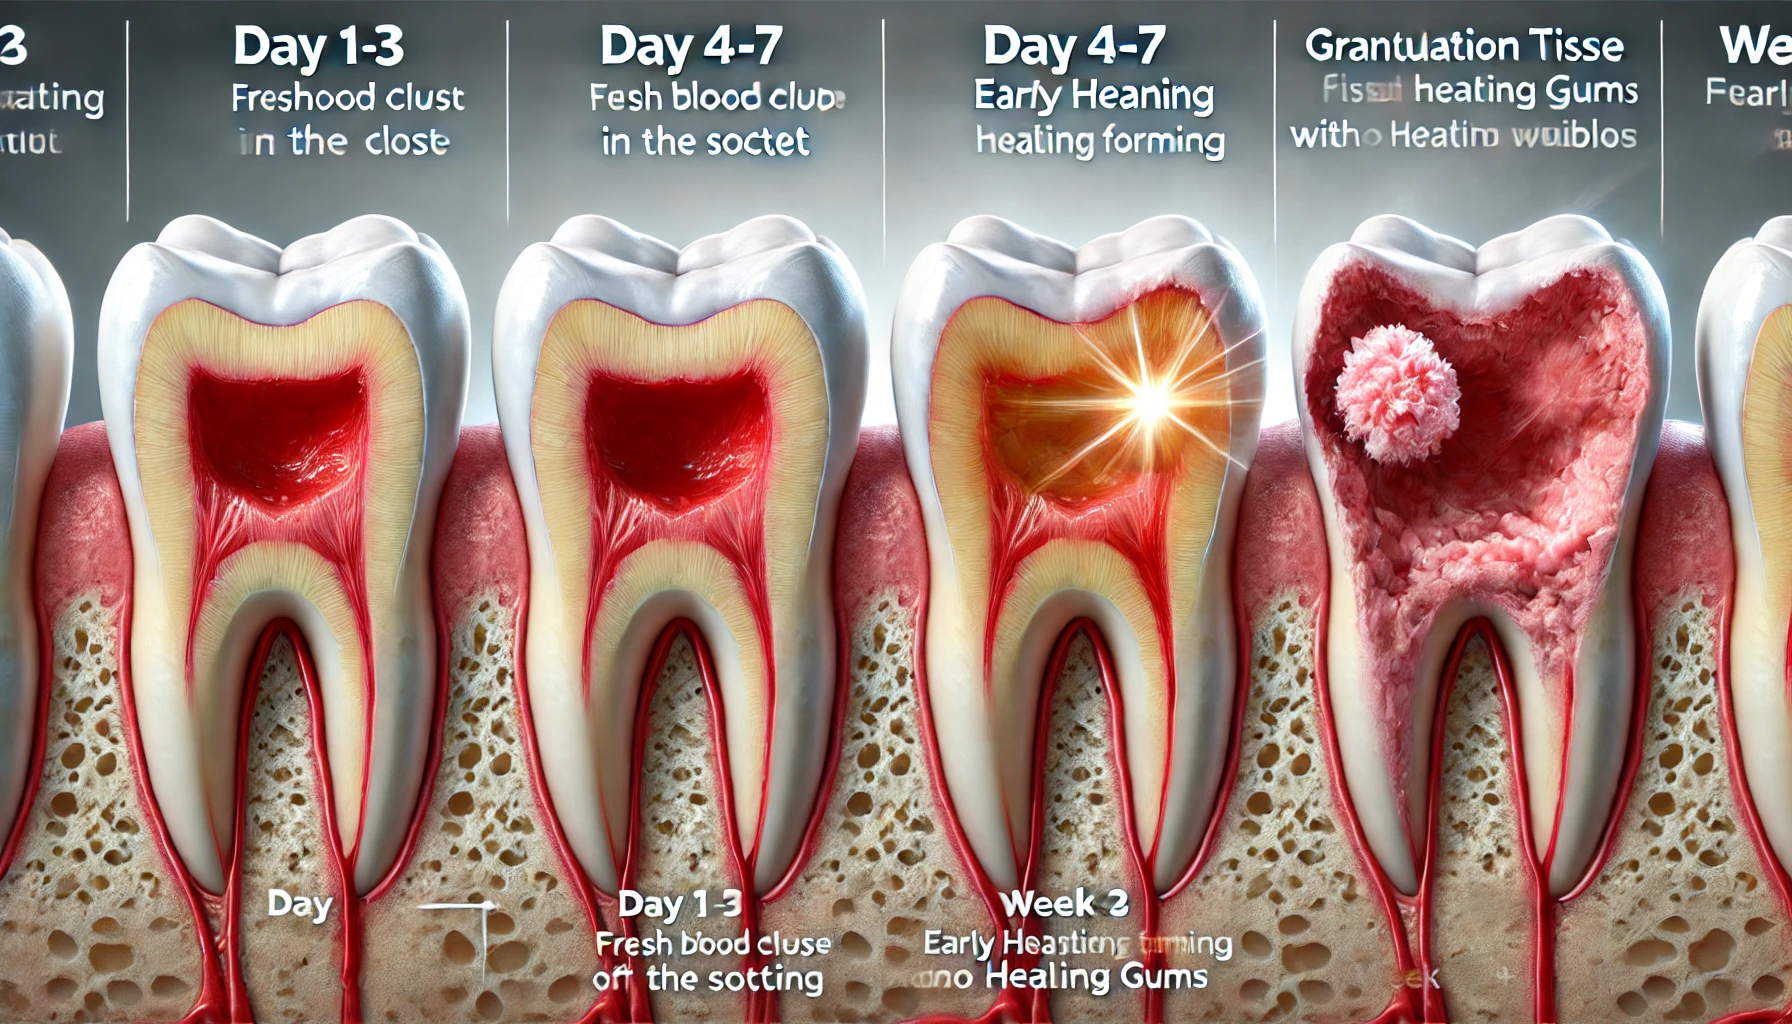
1. Immediate Post-Extraction (Day 1 to 3)
Right after the procedure, a blood clot forms in the socket. This clot is critical for healing. Images from this phase show a reddish-brown clot covering the area. Mild swelling and discomfort are expected, but proper aftercare will keep things under control.
During this time, avoid disturbing the site. Smoking, spitting, or using a straw could dislodge the clot and lead to a painful condition known as dry socket.
2. Early Healing (Days 4 to 7)
Within a few days, the clot begins transforming into granulation tissue. This stage marks the beginning of new cell growth. The extraction site may appear white or yellowish in photos, which is a normal part of the tissue rebuilding process.
Although mild discomfort persists, most patients report a reduction in swelling and pain. Transitioning to soft foods becomes easier now.
Importance of Monitoring Visual Cues
Images of healing tooth extraction help patients differentiate between normal healing and signs of infection. For instance, a foul odor, yellow pus, or unusual redness in images could suggest complications.
Additionally, observing others’ recovery photos offers a point of comparison. This visual feedback provides peace of mind and helps individuals stay on track with their recovery.
3. Granulation and Tissue Growth (Week 2 to 3)
By this point, the site is well into the granulation phase. Images reveal pinkish, healthy tissue covering the socket. Any remaining holes begin to close, and gum tissues start to knit together.
Because this phase involves significant internal healing, it is vital to continue gentle brushing and maintain oral hygiene. Though discomfort typically fades, a dull ache may linger occasionally.
Transitioning Into Full Healing
Most sockets close significantly within three to four weeks. Yet, internal bone healing may take several months. This is especially true for complex extractions or surgical procedures.
4. Complete Gum Healing (Month 1 Onward)
By week four, the site should look nearly identical to the surrounding gum tissue. Images from this phase often show smooth, uniform gums with no visible indentations. However, underlying bone regeneration continues silently.
Long-term healing varies depending on factors like age, overall health, and adherence to post-op care. For example, patients with diabetes or smokers may experience slower recovery.
What to Watch For in Healing Images
While reviewing images of healing tooth extraction, keep these indicators in mind:
- Color Changes: Redness should gradually fade. Pink or light gray tissue is a good sign.
- Tissue Texture: The socket becomes smoother as healing progresses.
- Absence of Swelling: By the second week, swelling should reduce significantly.
- No Signs of Infection: Pus, throbbing pain, or an unpleasant odor could signal infection.
Why Visual Content Matters in Healing
Visual learners find images to be powerful tools in understanding medical processes. Furthermore, pictures enhance comprehension, especially when medical jargon feels overwhelming. Comparing before-and-after photos also reinforces your trust in the healing process.
Moreover, healthcare professionals often recommend visual tracking through personal photos. Doing so helps your dentist assess progress during follow-up appointments.
Tips for Optimal Healing
To ensure your recovery matches what you see in healthy healing images:
- Follow your dentist’s instructions carefully.
- Use saltwater rinses after 48 hours to reduce bacteria.
- Stick to soft, non-irritating foods during the early days.
- Avoid physical exertion that could elevate blood pressure.
- Attend scheduled follow-up visits.
Healing is a journey, but with the right care and helpful visuals, it becomes much easier to navigate.
Conclusion
The journey from extraction to full recovery can feel daunting, but understanding the visual milestones helps tremendously. By studying images of healing tooth extraction, patients become better informed and more confident in their progress. Whether you’re researching in preparation or tracking your own recovery, these images serve as an essential guide to normal healing and when to seek help.

Technological advancements are helping revolutionize the healthcare ecosystem, with the Internet of Things (IoT) taking center stage as one of the most innovative technologies playing crucial roles in optimizing medical processes. However, the major challenge with the adoption of IoT medical devices is security. Implementing robust IoT healthcare security measures to safeguard your medical IoT infrastructure is essential as the risks associated with the technology continue to grow. The market value of the Internet of Things for healthcare hit a staggering $99 billion over the last few years, making it one of the fastest-growing industries, projected to hit $480 billion by 2031. Prioritizing medical device IoT security is a great way to protect patient data and minimize the threats of cyberattacks that often challenge healthcare organizations.
How to Improve Your Medical Business IoT Device Security
From smart homes to healthcare, IoT devices make a substantial impact on major industries. Unfortunately, the proliferation of the technology comes with significant security risks. Boosting IoT device security is especially vital in healthcare to maintain patient trust and ensure compliance. The following points outline the best practices for improving medical IoT devices security in your healthcare business.
- Secure Your Cloud Platforms
Cloud platforms are the preferred methods of storing data for many medical organizations and other businesses. Securing your cloud platforms should be a primary concern for healthcare leaders who want to protect their organizations from data breaches. You can enhance your cloud platform security by using authentication controls, such as multi-factor authentication, changing passwords regularly, and properly managing permissions and user credentials.
- Encrypt Data and Update Your Software and Firmware
Encryption is a vital component in protecting data stored and transmitted by IoT-enabled devices. It ensures that data remains unreadable to unauthorized users in the event of a system compromise. Employing industry-leading encryption protocols will help fortify your IoT medical device security. Medical businesses are also advised to regularly update their software and firmware to boost security. IoT medical device manufacturers often release updates to fix vulnerabilities in existing systems. Keeping up with new updates can prevent security loopholes that can compromise your patients’ safety. Automating updates is a great strategy to counteract emerging threats.
- Collaborate with IoT Medical Security Experts
IoT experts such as Empeek help medical businesses transform their healthcare IoT security. Collaborating with IoT companies will help you address common healthcare security issues that negatively impact customers’ experience and decrease efficiency. IoT security professionals can recommend practical security tips that your facility can adopt to ensure that sensitive patient data and your IT network stay safe. You can read this post here to learn more about the best practices to protect your medical IoT devices.
- Establish Robust Security Framework
It’s essential for hospitals and clinics to develop comprehensive security frameworks that encompass every facet of IoT device security. Thi includes, but is not limited to using robust access controls, implementing network segmentation and identifying IoT vulnerabilities in healthcare. Establishing robust security frameworks like these will ensure that your organization has the highest level of security. IoT medical devices should be strictly monitored and access controls should be set up appropriately.
Over 1,400 cyberattacks hit healthcare organizations in 2022 worldwide, a 74 percent increase from 2021. Enhancing healthcare IoT security is a complex but vital task for healthcare business administrators. Fortunately, you can reduce the risks of data breaches by implementing the above tips to protect sensitive patient data.

In a fast-paced world dominated by technology, constant connectivity, and overwhelming schedules, many individuals find themselves disconnected from the natural world. The demands of daily life can leave us feeling drained, mentally fatigued, and physically worn out. This is where GetWildfulness.com steps in, offering a transformative approach to healing and well-being through the power of nature.
At its core, GetWildfulness.com is a platform that emphasizes the deep connection between nature and mindful healing. It encourages individuals to reconnect with the environment around them, harnessing the calming effects of nature to restore balance to both mind and body. But what exactly is the power of nature, and how can it truly transform your health and well-being? Let’s explore the science behind it, the practices that make it effective, and the lasting benefits of embracing nature as a tool for mindful healing.
The Healing Power of Nature
Humans have evolved alongside nature, and for centuries, we’ve relied on natural spaces to find solace, clarity, and comfort. Recent studies have confirmed that being in nature can significantly reduce stress, anxiety, and depression, leading to improved mental and physical health. Nature has a unique ability to restore our bodies to a state of equilibrium, both physiologically and psychologically.
The Science of Nature’s Effect on Mental Health
Research has consistently shown that spending time in natural environments has a powerful impact on mental health. In a landmark study, researchers at the University of Chicago found that people who spent just 20 minutes a day in nature experienced lower levels of cortisol, the stress hormone, and an overall increase in feelings of well-being. Another study published in the journal Frontiers in Psychology demonstrated that exposure to green spaces can reduce the symptoms of anxiety and depression, improve mood, and even increase cognitive functioning.
The concept of nature therapy, or “ecotherapy,” is grounded in the idea that humans have a deep psychological and emotional need to connect with nature. It’s been shown that natural environments can help to lower blood pressure, reduce feelings of stress, and promote relaxation. Nature’s calming influence can bring about profound mental clarity and peace, which is essential for healing in today’s chaotic world.
Mindfulness: The Bridge Between Nature and Healing
Mindfulness is a practice that involves being fully present in the moment, observing thoughts and feelings without judgment. When combined with nature, mindfulness becomes an even more powerful tool for healing. GetWildfulness.com encourages individuals to practice mindfulness while immersed in nature’s beauty—whether that means taking a quiet walk through a forest, meditating by a lake, or simply sitting outdoors and absorbing the sights and sounds of the natural world.
Studies have found that mindfulness exercises in nature can enhance emotional regulation, increase self-awareness, and help individuals develop a deeper sense of calm and contentment. By being mindful in natural settings, we can begin to release accumulated tension, quiet our racing thoughts, and become more attuned to the present moment. This connection fosters a sense of inner peace and relaxation that is often difficult to achieve in the busyness of modern life.
Nature as a Natural Stress Reliever
One of the most powerful aspects of GetWildfulness.com is its emphasis on nature as a natural stress reliever. In our modern society, stress has become a ubiquitous part of everyday life. Whether it’s work-related stress, family obligations, or the constant pressure to stay connected and productive, the cumulative effects of stress can lead to burnout and various health issues.
However, nature provides a respite. The sights, sounds, and smells of natural environments have a profound impact on our stress levels. Simply being outside in a calming natural setting can reduce heart rate, lower blood pressure, and activate the parasympathetic nervous system, which is responsible for “rest and digest” functions. This makes nature a powerful antidote to the harmful effects of chronic stress, enabling individuals to regain their sense of balance and well-being.
The Role of Nature in Physical Health
The benefits of nature extend beyond mental health; they also play a significant role in physical well-being. Regular exposure to natural environments can help boost the immune system, improve sleep, and increase physical activity levels. Outdoor activities like hiking, walking, or even gardening have been shown to provide substantial cardiovascular benefits, while fresh air and natural sunlight contribute to improved vitamin D levels and overall health.
Moreover, studies have shown that spending time in nature can enhance recovery from illness. For example, patients who had access to nature views during their hospital stays tended to recover more quickly and report less pain than those without such access. This highlights the powerful role that nature plays in the body’s natural healing processes.
Mindful Practices for Healing
At GetWildfulness.com, there are several practices that individuals can engage in to experience the full benefits of nature’s healing power. Here are a few mindful activities to try:
- Nature Walks: Walking in nature not only provides physical exercise but also allows for moments of reflection and mindfulness. Whether it’s a stroll through a park or a hike through the woods, nature walks can help clear the mind and reduce stress.
- Forest Bathing (Shinrin Yoku): A Japanese practice known as Shinrin Yoku involves immersing oneself in a forest environment, breathing in the natural air, and being present in the moment. Studies have shown that forest bathing can lower cortisol levels, boost immune function, and enhance overall well-being.
- Meditation in Nature: Take your mindfulness practice outdoors. Find a quiet spot in a garden, by a lake, or in the forest, and focus on your breath. Nature’s calm surroundings will enhance your meditation practice, helping you connect more deeply with your inner self.
- Journaling in Nature: Bring a journal along on your nature excursions. Writing down your thoughts, reflections, and experiences while surrounded by nature can help process emotions, release stress, and gain insights into personal growth.
The Lasting Benefits of Nature Healing
The transformation that comes from engaging with nature is not just temporary—it’s lasting. Individuals who regularly immerse themselves in natural environments for mindful healing often report long-term benefits, such as improved emotional regulation, better physical health, and increased resilience to stress. Nature provides a sustainable, non-invasive approach to mental and physical well-being that can be integrated into everyday life.
Moreover, GetWildfulness.com encourages people to make nature a regular part of their healing journey. Whether it’s carving out time each week to spend outdoors or integrating nature-based mindfulness practices into daily routines, the key to sustaining these benefits is consistency.
Conclusion: Embrace the Healing Power of Nature
Incorporating nature into your daily life is not just a trend—it’s a return to something deeply embedded in our DNA. GetWildfulness.com offers a platform for individuals to tap into the healing power of nature and transform their minds and bodies in a profound way. By embracing mindful practices in natural settings, we can unlock the immense potential for healing, rejuvenation, and personal growth that nature offers.
If you’re ready to experience the benefits of nature firsthand, start by stepping outside, breathing deeply, and embracing the world around you. With the guidance of GetWildfulness.com, the journey toward a healthier, more balanced life begins in nature.

EpicureBiteed.com offers a unique platform for culinary enthusiasts who are eager to explore a diverse range of gourmet recipes and culinary adventures. This site brings together food lovers, aspiring chefs, and those simply looking to refine their cooking skills. With a collection of carefully curated recipes, EpicureBiteed.com not only provides users with delicious dishes but also guides them through the techniques and stories behind the world’s most celebrated cuisines. Whether you’re a novice in the kitchen or a seasoned chef, this site is an ideal destination for anyone passionate about food and cooking.
A Global Culinary Adventure
At EpicureBiteed.com, the focus is on bringing the world’s flavors to your kitchen. The platform presents recipes from every corner of the globe, allowing food lovers to experience diverse tastes and cooking styles. From the savory herbs of Italian pasta dishes to the vibrant spices in Indian curries, EpicureBiteed.com takes you on a culinary journey. The recipes are designed to be accessible for home cooks, yet they carry the authenticity and depth of traditional dishes.
Each recipe is carefully researched and tested, ensuring that the ingredients and methods are accurate to the cultures from which they originate. For example, a recipe for Thai green curry may include tips on selecting the right type of coconut milk or understanding the key balance of spicy, sweet, salty, and sour that defines the dish. This approach not only teaches cooking but also educates users on the importance of flavor balance, ingredient selection, and cultural significance behind every dish.
Easy-to-Follow Recipes with a Personal Touch
One of the standout features of EpicureBiteed.com is its ability to simplify gourmet cooking. While gourmet meals are often seen as complex and intimidating, the site breaks down each recipe into easy-to-follow steps that anyone can handle. By focusing on approachable instructions, the platform allows home chefs to recreate restaurant-quality dishes without the complexity.
What makes these recipes stand out is their inclusion of personal stories and tips from food experts. Each recipe is more than just a list of ingredients—it’s a narrative that shares the history behind the dish, its origins, and the nuances of the cooking process. By incorporating these personal touches, EpicureBiteed.com connects readers to the culinary traditions that have shaped each recipe.
Inspiring Culinary Creativity
EpicureBiteed.com encourages creativity in the kitchen. While the site’s recipes are rooted in tradition, they also inspire cooks to experiment with their own twists. A dish might call for a traditional ingredient, but EpicureBiteed.com suggests variations or substitutions that can suit personal tastes or dietary restrictions. Whether you’re a vegan, gluten-free, or someone who enjoys experimenting with flavors, EpicureBiteed.com provides alternatives to ensure that everyone can enjoy a fulfilling and personalized culinary experience.
Moreover, the platform offers guidance on plating and presentation, teaching users how to present their dishes beautifully and make them feel as though they were prepared in a Michelin-starred restaurant. This attention to detail allows EpicureBiteed.com users to feel confident about their cooking and embrace the art of presentation, turning every meal into a visual and gastronomic delight.
Educational Resources and Expert Advice
EpicureBiteed.com isn’t just about recipes—it’s also a hub of culinary knowledge. The site regularly features expert articles, tips, and cooking techniques to elevate your culinary skills. Whether you want to understand the science behind baking, master the art of knife skills, or learn the best practices for food storage, EpicureBiteed.com provides educational resources for cooks of all levels.
For beginners, there are easy guides on kitchen equipment and basic techniques, while more advanced chefs can dive into in-depth articles on topics like sous-vide cooking, fermentation, or pairing wine with food. This educational approach ensures that EpicureBiteed.com isn’t just a place to find recipes but a comprehensive resource for anyone looking to improve their culinary knowledge and skills.
A Community of Like-Minded Food Enthusiasts
In addition to being a recipe repository, EpicureBiteed.com fosters a community of food lovers who share a passion for cooking. The platform allows users to connect with other culinary enthusiasts through forums, comment sections, and social media groups. Here, people can exchange tips, share their own recipes, and even discuss food trends. This sense of community creates an interactive space where users can feel inspired, supported, and motivated to keep cooking and exploring new recipes.
The site also encourages user-generated content, such as recipe submissions or photos of dishes that readers have recreated. These contributions not only add variety to the content but also make the platform feel like a collaborative space where every cook has a voice. Whether you’re an experienced chef or a beginner, the community at EpicureBiteed.com provides a wealth of knowledge and inspiration.
Culinary Blog for the Food Curious
EpicureBiteed.com’s blog is another great resource for culinary explorers. The blog covers a wide range of topics related to food, cooking, and food culture. From deep dives into regional cuisines to articles on food sustainability and ethical eating, the blog offers in-depth research on topics that matter to today’s food-conscious consumer. Readers can explore articles on sustainable farming practices, the importance of organic ingredients, and tips for reducing food waste at home.
This focus on responsible eating and food sourcing ties back to the platform’s commitment to providing more than just culinary entertainment. EpicureBiteed.com aims to educate its audience on the broader impact of food choices, making it a responsible and forward-thinking resource for the modern cook.
Conclusion
EpicureBiteed.com is more than just a website for finding new recipes; it’s a culinary adventure waiting to unfold in your kitchen. By offering a blend of traditional and contemporary recipes, educational resources, and a supportive community, it empowers cooks of all levels to explore new flavors, master new skills, and share their culinary creations with others. Whether you’re seeking inspiration for your next meal or looking to enhance your culinary knowledge, EpicureBiteed.com is the ultimate resource for anyone passionate about food and cooking.
So, the next time you’re in the mood for a new culinary adventure, head over to EpicureBiteed.com, where gourmet recipes, expert advice, and a community of food lovers await.

Young Mickey Rourke: From Raw Talent To Hollywood Rebel

Jo McCubbin: Quiet Lives, Caring Careers, and the Stories Behind the Name

Master the Art of Predicting Tennis Scores with These Proven Tips and Techniques
Jo McCubbin: Quiet Lives, Caring Careers, and the Stories Behind the Name
Effectively Advertise on Feedbuzzard.com: A Comprehensive Guide