When it comes to home improvements and renovations, one of the best places to start is often right above your head—in the loft.
Adding insulation to your loft space represents one of the most cost-effective upgrades you can complete to both increase the value of your home and reduce your ongoing energy bills.
Here’s a look at why loft insulation ranks among the most worthwhile renovation projects, along with tips for getting the job done right.
Benefits of Loft Insulation
Insulating your loft delivers three primary benefits:
Cost Savings
One of the top reasons homeowners choose to add loft insulation is to reduce heating and cooling costs. Heat rises in a home, and much of it can escape through poorly insulated roof and attic spaces. By blocking this heat loss with extra insulation, you prevent wasting money on additional energy to heat and cool the rooms below. Most homes see a 5% to 20% reduction in total heating bills with improved loft insulation.
Increased Property Value
Updated lofts with ample insulation also boost your home’s overall resale value. Having documentation of new, quality insulation in your loft makes a home more appealing to buyers and enables you to command a higher sales price. Increased insulation also pays dividends when getting a home appraised.
Enhanced Comfort
You can also make your living space more comfortable with loft insulation. In other words, you will have lesser cold or hot spots around the house.
Loft Insulation Types and Recommended Depths
You should pay attention to two important factors when getting loft insulation. They include insulation type and depth. Let’s explore them in detail.
Insulation Types:
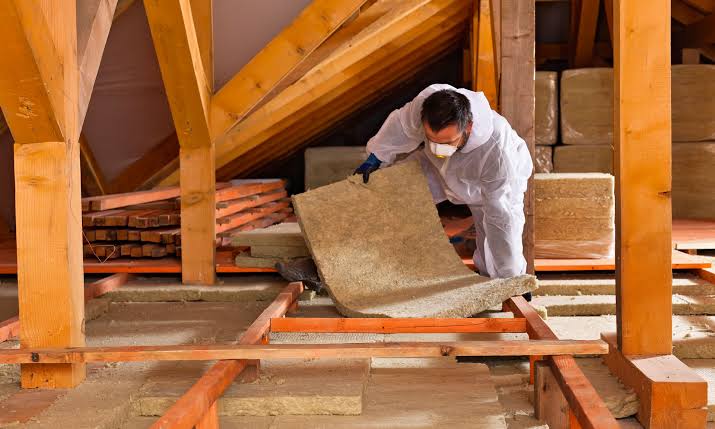
- Mineral Wool: Made of natural fibers like recycled glass or stone, mineral wool retards the transfer of heat while allowing moisture to move through it. It’s fire-resistant yet can absorb and release moisture without impacting effectiveness. Mineral wool batts and rolls work well for loft insulation.
- Cellulose: Comprised of recycled paper fibers, cellulose insulation is blown into place for a consistent fill and insulation value. It packs tightly to reduce convection and can add fire resistance. As an eco-friendly option, cellulose is a smart choice for lofts.
- Fiberglass: Fiberglass insulation consists of tiny glass fiber particles that trap air to impede heat transfer. Available as batts or loose-fill, fiberglass represents one of the most affordable insulation option for lofts. However, proper installation is key with fiberglass insulation in order avoid open spaces or settling.
Insulation Depth (Thickness):
To determine the ideal insulation depth for your loft, consider your home’s climate and heating degree days in your region along with the type of insulation used. Some guidelines include:
- Moderate Climates: R30-R49 (10-16 inches if fiberglass)
- Colder Climates: R30-R60 (10-20 inches if fiberglass)
- Mixed-Climate Homes: More insulation on the north than south loft walls
Key Considerations for Adding Loft Insulation
When planning a loft insulation upgrade, make sure to evaluate the following factors to ensure the project goes smoothly and delivers maximum benefits over the long term.
Accessibility and Storage
How accessible is your loft space currently? And do you utilize it for storage? Any items you intend to keep storing in your loft must get moved prior to insulation. And adding insulation often means creating updated access panels or doors to ensure insulation remains in place and undamaged over time. Plan this accessibility accordingly.
Ventilation
Upgrading your home with loft insulation can significantly add value and improve energy efficiency. For homeowners in Houston, opting for spray foam Houston is an excellent choice. This type of insulation not only provides superior thermal protection but also helps in reducing energy bills by sealing gaps and preventing air leaks.
While insulation acts as a barrier to heat transfer, lofts still require proper ventilation year-round. Work airflow, vent placement, and ventilation needs into the insulation upgrade plan. Ensure soffit and roof vents or fans aren’t blocked or covered by new insulation. Proper moisture control and ventilation prevents problems.
Electrical and Lighting
Evaluate any electrical systems, wiring, switches, outlets, and lighting inside the loft space. These systems may need extending or altering to accommodate depth changes from added insulation. Especially if storage access remains part of the plan, ensure lighting and any electrical runs to switches get modified as required based on final insulation depths and installation method.
Hiring an Insulation Professional
And for most homeowners, bringing in professional insulation installers represents the wisest move. Licensed insulation contractors possess the expertise to determine ideal insulation types and depths for your home’s climate zone. They also have the proper safety equipment and installation tools to add or replace loft insulation efficiently and adhere to any local building codes. This protects both your home investment and your family’s health and safety.
The Installation Process Step-By-Step
When left to the professionals, here is an overview of the typical loft insulation installation process:
- Initial Safety Checks and Preparation
- Test for adequate ventilation and airflow
- Cover any water tanks or pipes as needed
- Move or cover any items/storage in the installation area
- Removal of Old Insulation (if applicable)
- Clear loft of debris with vacuum system
- Carefully extract and dispose of old insulation
- Inspection and Repairs
- Identify and seal any gaps or access points needed
- Repair any roof leaks or moisture areas beforehand
- Adding Insulation
- Calculate total area and required insulation amounts/depths
- Use specialized blowers and infusion pumps to dense pack insulation into cavities
- Finishing Touches
- Install or improve attic access doors/panels with proper seals
- Ensure lighting and any electrical runs aren’t covered or hindered
- Replace storage items and check ventilation flow paths
By methodically progressing through these steps, the installation crew maximizes insulation coverage and effectiveness in your loft space for superior thermal performance To maximize the value of your home, consider various home improvement projects. For instance, to find home renovations services, it’s crucial to look for professionals who can offer comprehensive solutions, including loft insulation, which not only enhances comfort but also adds significant value to your property. Investing in such upgrades can provide long-term benefits and improve your living experience.
Maintenance Tips to Maximize the Benefits
Once the improved insulation gets installed, a little regular maintenance goes a long way towards maintaining its performance and benefits over time:
- Check for animal or insect access points and seal as needed to prevent settled insulation from becoming disturbed
- Examine periodically for any settling or sagging of insulation layers and top up as required
- Clean insulation contacts areas prior to storing items in loft areas to prevent potential mold or moisture damage
- Replace damaged vapour barriers or missing insulation access panels that could allow convection
- Avoid stepping directly on insulation or overloading storage weight capacity for the loft
Investing in loft insulation ranks among the most rewarding upgrade projects for your home. Partnering with professional insulation experts ensures you realize the full benefits for energy savings, comfort, and added real estate value both now and well into the future.